2021-2022: Renovating the deck
Disassembling the deck

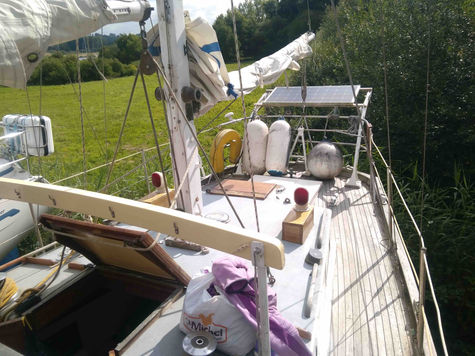
During the purchase, the expert told me that the deck would have to be changed. The wood (presumably teak) was still good and about 12mm thick, but the joints were worn out and there were leaks through the deck. Impossible to locate the origin, the water often having its own path!
The deck battens were glued, screwed from the inside (silicon bronze screws, which I couldn't extract because the heads were breaking off), and finally stapled into the joint from the outside. Some screws were flush on the bridge side: you could feel the spikes under your bare feet. Short said, the deck battens had to be replaced...

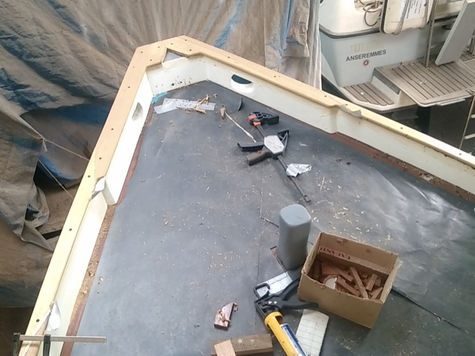
After a few days of removing/stripping the battens, I identify the cause of the water ingress in the cabins: areas where the plywood is damaged (rotten areas), and even delaminated areas (the layers no longer adhere between eachother). In short, the plywood needs to be replaced as well...
On the rear deck, the 2 main beams surrounding the access hatch are also rotten by this water ingress. Dismantling the rear deck is necessary to analyze the damage, with a few other surprises to come...
Reassembly of the deck
The deck battens were prepared in advance, in 15mm x 40mm sections. According to the advice I received, they didn't need to be steamed and I was able to use them directly. In the absence of information, I opted for the following strategy:
- don't screw the battens down (except outside, under the edge battens) so that you can easily sand or change the battens in the future
- do the edge battens first
- then the rest of the battens, clamping outwards
- finish with the king planks (the central parts, whose shape I thought I'd transfer using a tracing paper)
I used Sikaflex 298 adhesive with its primer SikaPrimaire 290 DC. If I had to do it again, I'd choose a competitor's product without primer, because once the primer has been applied, the batten has to be installed within 24 hours. This is an additional constraint, and caused me to scrap a few battens. On the other hand, this product sticks very well and swells a little, which fills the gaps left by the trowel.
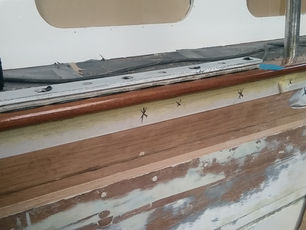
The first step is to install the edge battens, which are wider because they run all the way to the outside under the bulwarks.
Once the joins between the edge battens are marked out and cut, I mark out the edge of the hull on the underside of the battens, and machine at a distance (1cm - 1.5cm). This then allows me to cut the inner curve with a simple circular saw + guide.


As the glue was effective, I have to find ways of not bringing the battens into contact with the glue too soon (see first photo above). Using spacers (5mm) + plating, I 'simply' use clamps to bend the battens, and weights to additionally press them to the deck.
I did this in April and the glue's setting time meant I could work with 4 rows of battens at a time. A day was needed to lay 4 rows from one end of the boat to the other.
On the fore and rear decks, I had marked the maximum width of the king planks in relation to a central axis, indicating the minimum overlap of the battens.


As imagined, I tackled the king planks using tracing paper. This allowed me to:
- copy the shape of the battens precisely
- offset the lines to leave room for the joints
- cut the tracing paper to the new shapes
- transfer these shapes to a plank
The reward: problem-free installation.
For the record, I used the same piece of wood on the 4 king planks (2 at the front, 2 at the back), a sort of main theme from bow to stern.

To finish off the roof, I cut a 50mm gap (5mm joint + 40mm batten + 5mm joint) with a circular saw. As luck would have it, the blade is 50mm from the edge of the base plate, so I was able to use it without creating a special guide ;-)
The perimeter battens were kept away from the roof by wooden wedges, and away from the battens by the spacers previously used.

The final stages of this tedious renovation were (as recommended in Sika's "Teak Decking" guide, version 2/2017):
- cleaning the joints using an oscillating saw and a scraping blade (to remove the joint without damaging the wood too much)
- filling the joints with Sikaflex 290 DC Pro (prepared with primer 290 DC). Investing in an electric glue/putty gun relieved my forearms!
- sanding the dry joint (80 then 120 grit) with a belt sander (in the direction of the batten)
- oil-saturating the wood, which reveals the shades. Reapply regularly to prevent the wood from greying.

I noticed a few bubbles in the joints, not everywhere but in quite a few places. On rereading the application instructions, I suspect that the temperature rose (up to midday) during the initial drying time in these areas. I put the question to Sika, but have yet to hear back.
Given their exceptional customer service and technical support, I looked for competing products, and came across Tikalflex TSCplus, which performs the same function, without primer and without forming bubbles. If I'd known, I'd have avoided Sika!
The result is still very satisfactory, and of course I've protected it for the rest of the work!

Remounting bulwarks and cap rails
During dismantling, I was only able to save the 2 on the foredeck (port & starboard). The others had to be copied and re-machined. I realised that some of the water drainage holes were not positioned symmetrically on the 2 sides, which I corrected, of course.
I positioned each of the bulwarks (3 port, 3 starboard) to pre-drill the screw holes.
Thinking I was doing the right thing, I jointed and glued the 3 bulwarks on each side together, so that there was only one set per side. It turned out to be a fragile assembly that was difficult to handle, even with 2 people and 3 support points...


I tried to bend the cap rails (15mm x 50mm) without steaming them, which requires too much force. So I re-cut the joints between them using wider planks to start with, and tappered cuts. The result is clean, despite the numerous visible joints (6-7 on each side).
Should I do it again, I would use the same procedure as for the transom cap rails: I would machine wider planks to the curvature of the transom.

For the transom curves, I proceeded in stages to make the cut-outs needed to insert these parts into the previously installed cap rails.
Before attaching the genoa rails, I used a metal/cable detector to locate the screws used beforehand (to attach the wale and wale rails) so as not to drill in the same place. I didn't have any room for manoeuvre between the pre-drilled screws and the fixed distribution of the genoa rail screws!
Once the stanchions, pulpits and wooden cleats (not shown in the picture) are back in place, the boat looks great!


